
One of the most common mistakes that I find in patterns is when the instructions don't "math" up to the right number of stitches. When things don't work out properly, it can be our first instinct to think we've done something wrong. But that isn't always the case. Thus, I have become rather adept at counting how many stitches I'm supposed to have in a pattern in order to look for mistakes. In this blog, I'll attempt to share some of my tricks with you, in case you want to do the same!
The basics are pretty straightforward: K3 counts three stitches. It's the shaping stitches: increases and decreases, and then more complex magic like cables and lace that can get wonky. I would nominate lace as the most complex counting task, even beyond general shaping, just because the number of stitches is constantly changing within a row, and it can make it difficult to use markers to help you. (See this article where I talk about how to use markers to help you have to count less!)
There are generally two counts of a row you can have - the count before you work it and the count after. If you are lucky enough to follow a generously written pattern, they will often tell you the stitch count you are supposed to have once you've completed some shaping instruction that changes the total stitch count.
Here are some guidelines of how to count particular stitches before AND after you knit them. The "Before count" means how many stitches you should have in your row before you've worked that instruction. The "After count" is how many sts you would count after working that stitch. For example, if my row instruction read: K3, K2tog, K6, ssk, K1. The "before count" would be: 3+2+6+2+1=14 sts. The "after count" would be 3+1+6+1+1=12 sts.
| Stitch | Before count | After count |
| k2tog | 2 | 1 |
| p2tog | 2 | 1 |
| ssk | 2 | 1 |
| psso (or skp) | 2 | 1 |
| m1 (M1R, M1L) | 0 | 1 |
| yo | 0 | 1 |
| any double decrease | 3 | 1 |
Counting in Lace patterns
Lace patterns, as I mentioned are especially tricky because the number of sts is often changing every lace row. Usually there is a combination of increases (yo) and decreases (k2tog, ssk) within a single row. Sometimes this means that the overall number of sts does NOT change before and after the row, but within each repeat of the pattern (since the lace pattern is also, often, repeating). For example, your lace row might be: K3, *K2, K2tog, yo, K4*, to last 3 sts, K3. So while the k2tog would decrease the st count by 1, and the yo would increase it by 1, that would be a net 0 change.
The way that this is meaningful or helpful though, is when you are working your lace pattern, and something gets off. You may have missed a yo (the usual thing I miss) and it has offset the whole pattern. (See this blog entry for the story of when I had a lot of this type of pain). While it may require tinking to resolve, hopefully this method of counting can help you to find out more quickly when you have a counting error.
The way that this is meaningful or helpful though, is when you are working your lace pattern, and something gets off. You may have missed a yo (the usual thing I miss) and it has offset the whole pattern. (See this blog entry for the story of when I had a lot of this type of pain). While it may require tinking to resolve, hopefully this method of counting can help you to find out more quickly when you have a counting error.
Counting in Charts
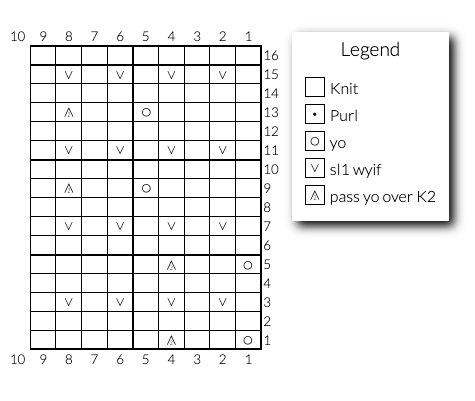
Counting stitches is another thing I do when following a chart. (Also, when I'm designing patterns with charts). Unfortunately it is not always the easiest thing to read. It is difficult to represent the changing counts of patterns in a chart, which can make the chart more difficult to read as well. This is where knowing how many stitches before and after an increase or decrease stitch can help. In the chart pictured here, the yo increases one stitch and the pass yo over K2 decreases by 1. The rest of the stitches don't change the overall stitch count.
 RSS Feed